
|
OpusFSI
Flight Simulator Interface for |
|

opusfsi_v6_Overview opusfsi_v6_User_Guide opusfsi_v6_Getting_Started_Single_PC opusfsi_v6_Getting_Started_Networked_PCs opusfsi_v6_ButtKicker
Getting
Started - Networked PCs
Virus
Checkers
We recommend turning off all
virus checkers whilst running P3D since they can have a serious effect
on performance and even stop or delete our software.
Performance
using Live View
Please
remember you cannot just rely on the frame rate measurements because P3D
will always give a fairly high priority to updating the screen. On
networked systems you must always give your server's P3D adequate
CPU capacity to perform other essential tasks, such as issuing the very
important postion updates. If your system has the stutters, then
it is these infrequent position updates from the server's P3D that
is producing them!
If
you are using P3Dv3 then enable the PDK
Interface to provide a more efficient Live View interface but
it is not recommended for P3Dv4. Refer to
the OpusPDK_Setup.txt file to set up the Prepar3D OpusPDK interface.
OpusFSI
has very little impact on the P3D performance and can generally
communicate the position updates as fast as P3D can issue them. So
if you are having stutter problems then you should investigate other
possible causes. For instance, make sure you are not running any software (AV or Firewall) that could be interfering with the SERVER program's piped
IPC link communications. Are you draining the P3D performance by
displaying too many views on the server, in-house we never drive more
than the single view on the server. Remember if you must have a wide
panoramic view then you can always install a wide view screen or use
three identical display screens with a TrippleHead2Go type product, in
which case, as far as the sim is concerned, you are still driving a
single main view, just one with a large pixel width. Other possible
causes could be your server's PC spec (is it up to the job),
insufficient memory (Windows 7 64-bit + loads of memory is highly
recommended), do you have a poor or slow network connection (this is the
age of Gigabit LANs - there's no excuse), is your actual aircraft sim
well behaved (or does it hog the processor?), is your scenery too
complex for your system, or have you been over enthusiastic with the P3D settings.
Try
turning OFF Live
Traffic and restarting the SERVER.
To
give you some idea as to what performance figures you should be aiming
to achieve, here are my details recorded using a high-spec server PC
with a single ASUS gaming laptop client (I have included the actual
server computer and client laptop specs below).
First
note, the client position update rates (most important) are
displayed in the client's Spy window for the 'Networked Live View
- Position and Attitude' application link when the aircraft is in motion.
Remember OpusFSI generally updates the client systems as fast as the
server P3D program can issue position updates.
On the ground
Sitting
on the runway in the Real Air SF260 at UK2000 East Midlands
Extreme airport,
Server Frame Rates: 50+ fps (67% full screen view), or 46 fps (2560 x
1600 full screen view)
Client Frame Rates: 40 to 50 fps (approx 1024 x 1040 view), or 28 fps
(1920 x 1080 full screen view)
Client Position Updates:
For P3D 8-20 updates per second with the server Live View Scan Rate
(server Config dialog) set to zero.
In
the Air
Cruising
at 4000ft in the Real Air SF260 (on a very cloudy day),
Server Frame Rates: 60 to 100 fps (67% full screen view), or 65 fps
(2560 x 1600 full screen view)
Client Frame Rates: 60 to 120 fps (approx 1024 x 1040 view), or 45 fps
(1920 x 1080 full screen view)
Client Position Updates: For P3D 8-20 updates per second with the server Live View Scan Rate
(server Config dialog) set to zero.
In both cases I have my target frames rates set to Unlimited. On my
server I am driving into a single 2560 x 1600, 32-bit Virtual Cockpit
view, and my client laptop is driving a single 1920 x 1080, 32-bit 2D
cockpit 'scenic' view.
Server PC:
Windows 7 64-bit
Intel Six Core, i7 X990 CPU @ 3.47GHz
24GB memory
465GB HDD
2 x 224GB Kingston SSD (P3D on one, every thing else
on drive C)
2 x NVidia GeForce GTX580s
Client ASUS Gaming Laptop:
Windows 7 64-bit
Intel Quad Core, i7 2630QM CPU @ 2GHz
12GB memory
2 x 700GB HDD
NVidia GeForce GTX560M
Client Lenovo Gaming Laptop:
Windows 10 64-bit
Intel Xeon, E3-1505M CPU @ 2.8GHz
16GB memory
2 x 500GB SSD
NVidia Quadro M4000M
My Server's Settings:
Graphics,
Target Frame Rates: Unlimited
Filtering: Anisotropic
Anti-aliasing: ON
Global Texture: V.High
Advanced Animations: ON
Scenery,
Level of Detail: Medium
Mesh Complexity: 100
Mesh Resolution: 2m
Texture: 7cm
Water Effects: High 1.x
Scenery: Very Dense
Autogen: Sparse
Ground Shadows: OFF
Special Effects: High
Weather,
Cloud Drawing: 110mi/176km
Thermal Vis: NONE
Disable Turb: YES
Detailed Clouds: YES
Cloud Cover: MAX
Traffic,
Airline: 32%
GA: 16%
Airport: Minimum
Road: 4%
Ships: 4%
Boats: 3%
My client system's view does not stutter with this setup and does not
change if I add a second client system. On some systems we have set the
target frame rates to 60 or Unlimited on the server and 24 on the client
systems. You may have to play with yours. One hint - if you're flying
along and the rain or snow is still falling vertically then P3D
cannot cope so try lowering your target frame rate to 30 or less.
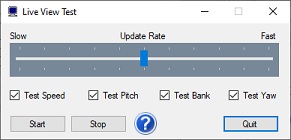
Live View Test
These tests are designed to
help you set up your Live View system and isolate problems within your
server, network, or client systems. Make sure you have set up all
systems in accordance with the Getting Started Guide for Networked
Systems.
Pay careful attention to all
the recommended sharing, permissions and security settings, remembering
the share both the install drive and folders of OpusFSI_V6 and your
simulator. Also pay attention to the recommended settings and
optimisation of your client systems.
Run the simulator and load the flights on the server and all client systems (or just the client system you wish to test and set up).
Your aircraft can be sat at an
airport before starting the test, alternatively you may conduct the test
with the aircraft positioned anywhere you want. The test is conducted at
an altitude of 3000ft on the server and an altitude of 2000ft on the
clients so ensure tests are conducted at airfields less than 2000 feet
above mean sea level (AMSL).
Your simulator should be run in
Windowed Mode on all systems.
Run the SERVER program on
your server and let it initialise, then run the CLIENT program on
each client system you are going to test.
Allow all the systems to settle down with all client system simulators fully initialised and positioned. You are now ready to conduct the Live View link tests.
To start the test, open the server Configure dialog and click on the Live View Test button. The Live View Test dialog will be displayed and your simulator will be un-paused.
On the server you will not be needing your simulator display so just minimise it to the taskbar.
Testing Your System
Testing Your Client System ...
Run the client side Live View Test first to make sure your client system can cope with the changing position and attitude updates reported via its SimConnect interface.
1. Close all Spy windows.
2. Pause your server system's simulator.
3. Open the Configure dialog on your client system.
4. Click on the Live View Test button.
5. Your aircraft should jump to 2000 feet above the runway.
6. With all Test tick boxes ticked, click the Start button.
7. Your client display should now show relatively smooth changes in attitude without any major stutters.
8. You should be able to alter the Update Rate slider and see a fairly smooth motion for all rates.
Testing Your Server Link ...
Determine Your Optimum Update Rate ...
Close any Spy windows you have opened and ensure you have minimised your server's simulator to the taskbar.
Start off with the Update Rate slider in the centre position and tick each of the Pitch, Bank, and Yaw test options, then click the Start button. You should now see your client display jump to 3000 feet above the surface and start moving in all three attitude axis. Let it run for a few seconds then click the Stop button. The client display should stop and reset straight and level without any significant delay. Adjust the Update Rate until you can run this test and Stop without any appreciable lag in the client response.
Once you have determined your optimum Update Rate open the Position & Attitude Spy window on your client system, start the test and make a note of the rough average number of Position Updates per second. Divide 1000 by this figure and set the ms rate in the Live View Scan Rate box provided in the Configure dialog e.g. 100 updates per second is 10 ms. For P3D you may need to set the server Live View Scan Rate to zero.
Both server and client systems display the following reports,
P3DSERVER,
APP Position Updates: SIM xxx LAN xxx /sec
P3DCLIENT,
APP Position Updates: LAN xxx SIM xxx /sec
On the server, the SIM and LAN counts indicate the approximate rate at which SimConnect updates are received and IPC updates are transmitted. On the client, the LAN and SIM counts indicate the approximate rate at which IPC updates are received and SimConnect updates are sent to the P3D sim.
N.B. These rates are not synchronised so will not be identical.
Stuttering
Client Display
Your client display should move fairly smoothly with no major stutters or abrupt changes in attitude.
If your client display stutters badly running the Live View Test on your Server then you most likely have a problem with either your network connection or your actual client simulator system, try conducting the Live View Test on your client system.
If your client display stutters badly whilst running the Live View Test on your Client then this will indicate your client simulator system cannot cope with the position and attitude updates. Please make sure you have optimised your client simulator system, stopped all unnecessary software including any virus scanners, selected a stock or dummy simulator aircraft (e.g. the stock C172 or B737). You could also try adjusting the simulator settings, changing the simulator's target frame rate etc. For P3D you may need to set the server Live View Scan Rate to zero.
Options
Update
Rate
This slider will typically alter the update rate from between 50 updates per second (Slow) up to about 120+ updates per second. This slider should be adjusted so that there is no appreciable lag when Stopping the test.
If there is a lag then reduce the rate of updates sent from the server by adjusting the configurable scan rate (i.e. increase the value) in the server Configure dialog's Live View Scan Rate (ms).
Test
Tick Boxes
The Test Speed, Pitch, Bank and Yaw tick boxes allow you to select speed and each of the attitude modes individually.
Start
Button
Click the Start button to start the test and vary the selected pitch, bank and yaw attitudes for the aircraft. At the start of a test the aircraft is automatically positioned 2000 feet AGL.
Stop
Button
Click the Stop button to terminate the test and recentre the aircraft.
Quit
Either click on the Quit button or the dialog's X to abort the test and close the Live View Test dialog.
FAQ and Troubleshooting
Selective Updates with Client Systems Warning
Due to several omissions and errors within the Lockheed Martin weather related SimConnect and PDK functions it is not possible for OpusFSI to correctly reset and manage certain weather data. As a result, if you have performed any selective weather updates and you shutdown any Prepar3D simulator then it is imperative that you shutdown all Prepar3D simulators along with all
SERVER and CLIENT programs. In other words, after any selective weather updates, shutting down any Prepar3D simulator will require a full system restart.
TypeInitialisation
errors
when running the
client
program
Select the .NETv4 variant of
SimConnect and SlimDX.
SlimDX
error
You must ensure the P3DCLIENT program ...
Is starting in the correct c:\OpusFSI_V6 folder.
Has permissions to copy and rename the relevant SlimDX DLL file.
Is able to copy the current SlimDX DLL, it's not locked or write protected.
Is not blocked by AV or Win Defender software.
Otherwise its attempt to copy and rename the SlimDX file will fail. You may also need to install the SlimDX 4 runtime using our supplied msi file in the OpusFSI_V6 folder.
Can't connect to client
Have you configured the correct number of clients in the server?
Can you still see the server's OpusFSI drive and folder in Windows Explorer on your client?
Check a windows update hasn't re-enabled 'password protected sharing' on the PCs.
Is an Anti Virus program active or Win Defender active on the client? Stop Anti Virus software and disable Win Defender since
these will cause problems and even possibly stop or delete the software.
Are you identifying the server using its IP Address or Computer Name? Try both methods.
Does the client IP Address have the same group numbers as the server, as per the GS Guide?
Can I use a Wi-Fi network ?
Yes
you can, however you should note that a direct Wi-Fi link is only going
to give you 54Mbps and a redirected link will operate at about 16 to
24Mbps. This may be faster than an ancient 1990s 10base-T network
running at 10Mbps but nowadays everyone uses either 100Base-TX (100
Mbps) or a 1000Base-T gigabit LAN running at 1000Mbps (1Gbps). The
modern cabled LANs are going to operate up to 64 times faster than the
Wi-Fi link!
However, if you must use a Wi-Fi link (no LAN ports or Cat5 cable) then
just make sure all the computer systems have the same workgroup set
(Control Panel - System and Security - System - Change Settings -
Change...) and configure the main server's computer name into the CLIENT programs. You will find the link works perfectly well with
perhaps a few tiny jitters when taking off of flying fast and low
(depends how good or busy your Wi-Fi link is).
My
client system lags behind the server
The lag indicates the clients cannot keep up with the updates. The programs have 32K buffers for both receive and transmit over each IPC link, hence the possible back log.
There
are two solutions. The best is to reduce the rate of updates sent from
the server by adjusting the configurable scan rate (i.e. increase the
value) in the server Configure dialog's
Live View Scan Rate (ms). The second solution is to occasionally
pause using the 'P' key on the server, let everything catch up and then
unpause, let things settle and the lag will then be gone. You can also
use the pause key to measure the lag or amount of buffering at the
client end. If the system is configured and tuned correctly there should
never be any lag and both server and client should pause together almost
instantly. If your system is set up correctly it should be able to cope
with the throughput.
We have a Live View test facility to help you tune your system.
Start
up all the client P3D systems and the server P3D so that they are all up
and running. Then start the SERVER program, let it settle, then each
of the CLIENT programs. Once they connect their P3Ds will normally
reload to the new location, they will also resync after receiving their
first weather update (necessary to ensure correct cloud sync). Once all
the client systems are settled then you can force another weather update
just before takeoff to make sure all is well and then you are ready to
go.
It
is very important to set up your client systems as per the Getting
Started guides to optimise your client systems, this can have a dramatic
impact on the performance. It also helps if you are displaying scenic
views to select one of the simple P3D stock aircraft ( e.g. the C172 or
B737), some people even use a dummy aircraft that has zero overheads.
You may also try adjusting the target frames rates, either Unlimited or
on slower systems you could even set 20 to 30. It's all about giving P3D
more time to process the stream of position updates.
Also,
if you are using Static Weather Themes and have paused the system for
any length of time (>1min), then it would be best to select Weather
on the SERVER and click Update Weather, this re-synchs everything
including the cloud formations. The tell tale sign that one system has
been paused too long is that you will get different cloud formations on
the server and client system. Anytime this happens just re-sync via the
Weather option in the SERVER program. If you don't pause this should
never happen.
We
also recommend not running anti-virus software since this can have a
serious performance effect on the clients and
can even stop or delete our software.
Can't
get cameras or weather on the clients
You
haven't set up your sharing and security permissions for Everyone on
your server and client systems. Both the drive and the P3D install
folder must be shared and accessible to the OpusFSI program. Hence you
have no client weather (the client cannot copy the weather file), and
you have no external aircraft view (the client cannot prepare your
aircraft.cfg files).
You should also have the all the standard views available, so with a
cockpit view on display on the client, hitting the S key four times
should cycle to the custom external aircraft view. But this will only
happen when the CameraDefinition has been appended to the aircraft.cfg
files.
Both systems must be shared with all security permissions set as per
this guide.
Win7
and XP networked systems
You
may (or may not) experience problems if you have both Win7 and XP systems on your
network. Removing the homegroup and reverting
to standard networking may help.
and
http://www.youtube.com/watch?v=VRY4_POp9zA
Home About Us Products Downloads FAQ Gallery Testimonials Contact Links